Looking for a fun and simple way to attract more birds to your yard? You’re in the right place.
Making a cookie cutter bird feeder is easier than you think, and it’s a great project that adds charm to your outdoor space. Imagine watching colorful birds visit your homemade feeder every day. In this guide, you’ll discover step-by-step how to create your own bird feeder using cookie cutters.
Ready to bring more life and joy to your garden? Keep reading, and you’ll have your bird feeder ready in no time!
Choosing The Right Cookie Cutter
Choosing the right cookie cutter is key to making a bird feeder that’s both functional and charming. The cutter shapes the feeder and affects how the birdseed sits and how easily birds can access it. Picking the perfect cutter sets you up for success before you even start crafting.
Materials To Consider
Cookie cutters come in various materials, each with its pros and cons for your bird feeder project. Metal cutters are sturdy and create sharp, clean edges, which help the feeder hold its shape well. However, they can rust if exposed to moisture, so it’s best to use stainless steel or aluminum ones.
Plastic cutters are lighter and often cheaper but might bend or break during the process. They are easier to clean and won’t rust, making them a good choice if you’re planning to reuse the cutter multiple times. Silicone cutters offer flexibility but may not provide crisp edges, which could affect how the seed mixture fits.
Size And Shape Tips
Think about the bird species you want to attract when choosing the size of your cookie cutter. Small shapes work well for tiny birds like finches, while larger shapes can accommodate bigger birds such as cardinals or blue jays. A cutter about 4 to 5 inches in size strikes a good balance for many garden birds.
The shape matters beyond just aesthetics. Open designs or cutters with cut-out patterns allow better access to seeds, encouraging birds to feed comfortably. Avoid overly intricate shapes that might make the feeder fragile or difficult to fill.
Have you noticed which shapes your backyard birds prefer? Trying different sizes and shapes could lead to surprising results and more feathered visitors.
Gathering Supplies
Gathering the right supplies is the first step to creating a cookie cutter bird feeder. Having everything ready helps the process go smoothly. It also ensures the feeder will be safe and inviting for birds. Focus on tools and materials that are easy to handle and bird-friendly.
Essential Tools
- Cookie cutters in various shapes and sizes
- Mixing bowl for the birdseed mixture
- Measuring cups for accurate ingredient amounts
- Wooden spoon or spatula for stirring
- Baking sheet or tray to set the feeders
- Parchment paper to prevent sticking
- String or twine for hanging the feeders
- Scissors for cutting the string
- Small brush for spreading the mixture inside cutters
Bird-friendly Materials
- Uncooked birdseed suited to local birds
- Natural peanut butter or suet as binding agents
- Plain gelatin to help the feeder hold shape
- Non-toxic, biodegradable string for hanging
- Optional: small nuts or dried fruits as treats
- Avoid processed foods or anything with salt or sugar
Preparing The Ingredients
Preparing the ingredients is the first key step to create a cookie cutter bird feeder. The right mix of seeds and the proper binding agent make sure the feeder holds together well. This stage sets the foundation for a bird feeder that birds will love and that will last outside.
Mixing The Seed Blend
Choose seeds that attract many birds. Sunflower seeds, millet, and cracked corn work well. Mixing different seeds helps draw various bird species. Keep the seeds fresh and dry before use. Measure the seeds to get a balanced mix. Aim for a blend that is not too dry or too oily. This makes the feeder tasty and less messy.
Binding Agents To Use
Binding agents hold the seeds in place inside the cookie cutter. Use natural ingredients safe for birds. Common options include:
- Gelatin: Dissolve in warm water to create a sticky base.
- Peanut Butter: Use smooth and unsalted for easy binding.
- Corn Syrup: Mix with seeds to form a firm hold.
- Flour and Water Paste: A simple, non-toxic glue alternative.
Choose a binder that hardens well but is safe for birds to eat. Test small amounts to find the best texture. The binder should keep the seeds together without being too hard.

Credit: www.pinkstripeysocks.com
Shaping The Feeder
Shaping your cookie cutter bird feeder is where your creativity meets practicality. This step ensures the feeder holds together well and attracts birds effectively. Paying attention to how you fill and press the mixture will make all the difference in durability and appearance.
Filling The Cookie Cutter
Start by placing your cookie cutter on a flat surface covered with parchment paper or a silicone mat. This prevents sticking and makes removal easier later on.
Fill the cookie cutter with your bird seed mixture gradually. Don’t just dump it in—add small amounts and spread it evenly with your fingers or a spoon.
Ensure the seeds reach every corner inside the cutter. This step is crucial to avoid weak spots that could break apart once dried.
Pressing And Compacting
After filling, press the mixture firmly inside the cookie cutter. Use the back of a spoon or your palm to compact the seeds tightly.
Compacting helps the feeder hold its shape and prevents seeds from falling out. It’s a simple action that makes a huge difference.
If you feel the mixture is too loose, add a bit more binder (like gelatin or peanut butter) to help it stick together better.
Have you noticed how a tightly packed feeder lasts longer and attracts more birds? That’s the reward for taking the time to press properly.
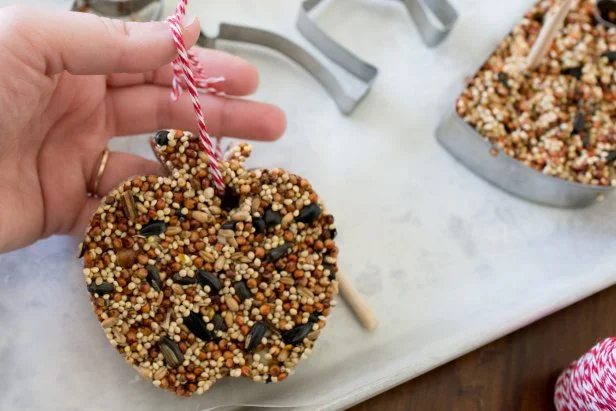
Adding Hanging Options
Adding hanging options to your cookie cutter bird feeder is a crucial step that determines how well it will stay in place and attract birds safely. Choosing the right hanging material and securing it properly can prevent your feeder from swaying too much or falling. It also affects the ease of refilling and cleaning, so think about what suits your space and needs best.
Choosing String Or Wire
Deciding between string and wire for hanging your feeder depends on durability and appearance. String offers a softer look and is easier to tie, but it may wear out faster outdoors. Wire is stronger and lasts longer, especially if coated to resist rust, but it can be tricky to handle without tools.
Consider what’s around your feeder spot. If there are sharp branches or rough edges, wire might hold up better. On the other hand, natural jute or cotton string can blend nicely into garden settings. What kind of weather does your area get? Moisture and wind can quickly weaken some strings.
Securing The Feeder
Once you pick your hanging material, securing it tightly is key to avoid accidents. Wrap the string or wire firmly around the top of the cookie cutter shape, making sure it won’t slip off. Double knots or twisting wire ends are simple ways to lock everything in place.
Adding a small loop at the top helps you hang the feeder on hooks or branches easily. Test the strength by gently pulling before hanging it outside. This small check can save you from losing your feeder and spilling birdseed all over the ground.

Credit: thekrazycouponlady.com
Drying And Setting
Drying and setting your cookie cutter bird feeder is a crucial step. It ensures the feeder hardens properly. A well-dried feeder lasts longer outside. It holds birdseed without falling apart. Choosing the right drying method affects the feeder’s strength and durability.
Air Drying Tips
Air drying is simple and natural. Place the feeder on a flat surface. Choose a dry, warm room with good airflow. Avoid direct sunlight to prevent cracking. Turn the feeder gently every few hours. This helps even drying on all sides.
Drying time depends on thickness and humidity. Expect at least 24 to 48 hours for complete drying. Check if the feeder feels firm and solid. If it is still soft, let it dry longer. Patience is key for best results.
Using The Oven Method
The oven method speeds up drying. Preheat your oven to a low temperature, around 200°F (93°C). Place the feeder on a baking sheet lined with parchment paper. Bake for 30 to 60 minutes, checking often.
Keep the oven door slightly open for moisture to escape. Remove the feeder when it feels dry and hard. Let it cool completely before handling. This method reduces drying time without cracking.
Placing Your Feeder Outdoors
Placing your cookie cutter bird feeder outdoors is more than just hanging it up. The spot you choose affects how often birds visit and how safe they feel while feeding. Think of it as creating a little bird sanctuary that invites feathered friends to stay longer.
Selecting The Best Location
Choose a spot visible from your favorite window so you can enjoy watching the birds. Look for areas with some nearby trees or shrubs—birds love having quick shelter close by. Avoid placing the feeder too close to busy walkways or noisy areas to keep the birds comfortable.
Make sure the feeder is easy for you to reach for refilling and cleaning. A height of about 5 to 6 feet works well—high enough to keep away some pests but low enough for you to access. Have you noticed how birds prefer feeders with a bit of shade during hot afternoons? Try positioning your feeder where it gets morning sun and afternoon shade for the best results.
Protecting From Predators
Predators like cats and squirrels can scare birds away or even harm them. To prevent this, avoid placing the feeder near branches or fences that predators can use to jump onto it. You can install a baffle—a dome or cone-shaped guard—above or below the feeder to block unwanted visitors.
Consider putting your feeder at least 10 feet away from dense shrubs where cats might hide. If squirrels are a problem, try a feeder designed to close under their weight or add a slippery pole cover. Have you tried adding a separate squirrel feeder to keep them distracted? It might just save your bird feeder from constant raids.
Credit: www.foodnetwork.com
Maintenance And Refills
Maintaining your cookie cutter bird feeder keeps birds healthy and happy. Regular refills attract more visitors to your garden. Proper care extends the feeder’s life and ensures cleanliness.
Cleaning Tips
Clean the feeder every two weeks to stop mold and bacteria. Use warm water and mild soap. Avoid harsh chemicals that can harm birds. Rinse well to remove all soap. Let it dry completely before refilling.
Remove old seeds and debris before adding fresh food. Use a small brush to reach tight spots. Keep the feeder in a shaded place to reduce mold growth. Check for cracks or damage during cleaning.
Seasonal Adjustments
Change the type of food based on the season. Offer high-energy seeds like sunflower in winter. Use softer seeds or fruit in summer. Remove leftover food during hot weather to prevent spoilage.
Move the feeder to a sheltered spot in bad weather. Protect it from strong winds and heavy rain. In freezing temperatures, check for ice buildup. Adjust feeding times to early morning or late afternoon in hot months.
Frequently Asked Questions
What Materials Do I Need For A Cookie Cutter Bird Feeder?
You need cookie cutters, birdseed, gelatin, water, a mixing bowl, and string or ribbon to hang the feeder.
How Do You Make A Cookie Cutter Bird Feeder Step-by-step?
Mix gelatin and water, add birdseed, press into cookie cutters, chill until firm, then hang with string.
Can Cookie Cutter Bird Feeders Attract Different Bird Species?
Yes, they attract various birds depending on the seed type used in the feeder mix.
How Long Do Cookie Cutter Bird Feeders Last Outdoors?
They typically last a few days to a week before needing replacement, depending on weather.
Conclusion
Creating a cookie cutter bird feeder is simple and fun. It helps birds and adds charm to your garden. Kids love making them too. This project uses easy-to-find materials. Plus, it takes little time and effort. Encourage creativity with different shapes and colors.
Enjoy watching birds visit your homemade feeder. It’s a rewarding activity for all ages. Try it and see your backyard come to life. Happy birdwatching!