
Have you ever wanted to draw birds that look real and full of life? Understanding bird anatomy is the key to making your sketches stand out.
When you know how a bird’s body is built, you can capture its movement, posture, and unique features with ease. This guide will show you simple steps to learn bird anatomy, so your drawings become more accurate and impressive. Keep reading, and you’ll discover tips that make drawing birds easier than you ever thought possible.
Your art is about to take flight!
Basic Bird Anatomy
Understanding bird anatomy helps create accurate and lifelike drawings. Focus on the bird’s basic shapes, wing structure, and feather placement. Observing these key parts makes drawing birds easier and more natural.
Understanding basic bird anatomy is crucial for artists aiming to capture the essence of these magnificent creatures. When you grasp the fundamentals, your drawings become more accurate and life-like. Let’s dive into the core components of bird anatomy to enhance your artistic skills.Skeleton Structure
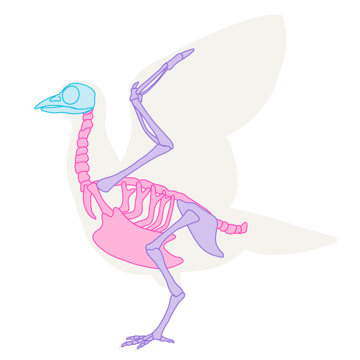
The bird’s skeleton is a lightweight marvel, designed for flight. Birds have a rigid spine with fused vertebrae, which supports their flying muscles. Notice the keel or breastbone; it’s where powerful flight muscles attach. Birds also have hollow bones, reducing weight without sacrificing strength. Observe the long, slender bones in the wings, similar to our fingers. These adaptations are what allow birds to soar gracefully.Muscle Placement
Muscles play a vital role in a bird’s ability to fly and move. Birds have large pectoral muscles that provide the power needed for flight. These muscles are anchored to the keel of the skeleton. Focus on the way muscles are distributed around the wings and legs. The streamlined muscles under a bird’s skin contribute to its aerodynamic shape. This is key to capturing realistic movement in your drawings.Feather Arrangement
Feathers are not just for beauty; they are essential for flight and insulation. Primary feathers are located on the outer wing, crucial for lift and thrust. Secondary feathers, found closer to the body, help with balance and steering. Observe the layering of feathers. Each type of feather has a specific role, from contour feathers that shape the bird, to down feathers for warmth. Understanding this helps you depict textures and patterns accurately. Remember, patience and observation are your best tools. How can you apply these insights to your next drawing?Sketching Bird Shapes
Sketching bird shapes sets the foundation for capturing their natural form. Start with simple outlines that show the bird’s overall posture. Focus on basic shapes like ovals and circles to map out the body. Keep lines light to allow easy changes as you refine the drawing.
Understanding the main shapes helps to keep proportions correct. This step guides the placement of wings, tail, and head. A clear shape sketch makes the drawing look balanced and natural.
Body Proportions
Bird bodies are usually oval or rounded. The size of the body changes by species but stays the main focus. The head is smaller and sits on the body, often as a circle or small oval. The neck can be short or long, depending on the bird type. Use simple shapes to mark the body parts before adding details.
Wing Shapes
Wings differ widely in shape and size. They often look like elongated triangles or curved ovals in sketches. The wing base starts near the bird’s shoulder and extends outward. Sketch the wings slightly open or folded to show natural position. Keep the main bones in mind for correct wing shape and movement.
Tail Design
Tail shapes vary from short and round to long and pointed. Start with a simple triangle or fan shape for the tail. Position it at the rear of the body. The tail helps balance the bird’s form and movement. Sketch the tail feathers spread or closed to add life to the drawing.
Drawing Bird Heads
Drawing bird heads can be both challenging and rewarding. The head holds much of the bird’s character, so capturing its unique features is key. Paying attention to details like the beak shape, eye placement, and feathers will make your drawing come alive.
Beak Variations
Bird beaks come in many shapes and sizes, depending on their diet and lifestyle. Some have sharp, hooked beaks for tearing meat, like hawks, while others have short, stout beaks for cracking seeds, like finches.
Try sketching different beak types to understand their structure better. Notice how the beak’s curve and length affect the overall head shape. This small detail can tell a story about the bird’s habits without words.
Eye Placement
Where the eyes sit on the head changes the bird’s expression and field of vision. Predatory birds have eyes facing forward, giving them depth perception for hunting. Songbirds usually have eyes on the sides, helping them spot predators.
When you draw, place the eyes carefully to reflect the bird’s nature. Eyes also vary in size and shape, so observe your subject closely. Have you noticed how some birds have a fierce gaze while others appear gentle? Capturing this can bring personality to your drawing.
Head Feathers
Feathers on the head can be smooth or fluffy, short or long, and sometimes form unique crests or tufts. These details add texture and interest to your sketch.
Try using light strokes to represent soft feathers and sharper lines for spiky ones. Think about how lighting affects the feathers’ appearance and add shadows accordingly. Have you ever realized how much feathers influence the bird’s overall mood and style?

Credit: design.tutsplus.com
Capturing Bird Movement
Capturing bird movement is key to creating lifelike drawings. Birds rarely stay still. Their bodies shift quickly in flight, on branches, and on the ground. Observing these motions helps you draw dynamic and realistic poses. Study their muscle flow and wing stretches. Notice how feathers align with each motion. This understanding brings energy and life to your art.
Flight Poses
Drawing birds in flight shows their grace and power. Focus on wing shapes and angles. Wings can be fully spread or tucked slightly. Pay attention to feather layers and tail position. The body leans forward, showing momentum. Include stretched necks and focused eyes. Small details like curved claws add realism. Capture the swift, flowing motion with smooth lines.
Perching Positions
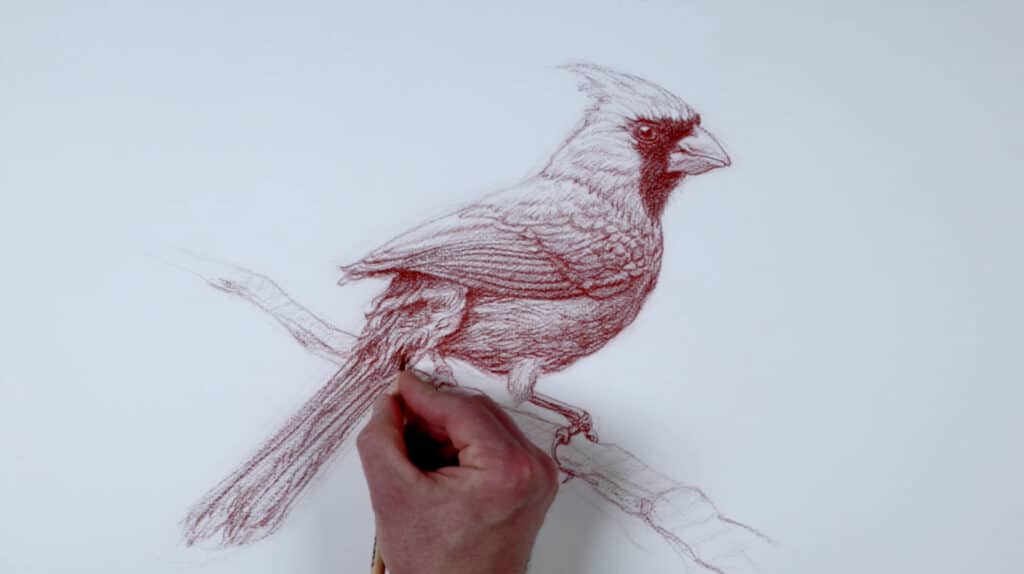
Birds balance delicately on branches or wires. Their feet wrap tightly around the perch. The body may tilt or stay upright. Tail feathers help with balance. Wings often rest close to the body or slightly open. Study the head turns and alert eyes. Small shifts in posture show mood and readiness. Use gentle curves and soft angles for natural poses.
Walking And Running
Birds walk with quick, light steps. Legs bend sharply at the joints. To draw walking birds, show one foot lifted or forward. Running birds stretch their necks and bodies. Wings may open for balance. Tail feathers fan out slightly. Note how muscles tighten during fast movement. Use short, confident strokes to suggest speed and rhythm.
Shading And Texture
Shading and texture bring your bird drawings to life by adding realism and depth. Without these elements, even the most accurate anatomy can feel flat and uninteresting. Paying attention to how light interacts with feathers and skin will make your artwork more convincing and captivating.
Feather Details
Feathers have unique patterns and layers that you need to capture carefully. Start by observing the direction each feather grows and how they overlap. Use fine, short strokes to mimic the softness and subtle variations in texture.
Try varying your pencil pressure to show the difference between the fluffy down and the sleek flight feathers. Adding tiny lines and slight irregularities makes the feathers look natural instead of uniform. Have you noticed how some feathers catch the light differently? Capturing these nuances will elevate your drawing.
Light And Shadow
Understanding light and shadow is essential for shading bird anatomy effectively. Identify your light source and shade the areas opposite to it to create contrast. This contrast helps define the bird’s form and makes it appear three-dimensional.
Use smooth gradients to transition between light and dark areas without harsh lines. Shadows don’t have to be pure black; varying gray tones add richness. Ask yourself how the bird’s body curves and where shadows would naturally fall—under the wings, around the neck, or beneath the tail.
Adding Depth
Depth in your drawing comes from layering different shades and textures. Start with a light base layer and build up darker tones gradually. This layering technique helps avoid a flat look and gives volume to the bird’s body.
Contrast plays a big role here. Place darker shadows next to lighter highlights to enhance the sense of depth. You can also use blending tools or your fingers to soften transitions, making the bird appear more lifelike. What parts of the bird’s anatomy do you think need the most depth to stand out?

Credit: johnmuirlaws.com
Common Mistakes To Avoid
Drawing bird anatomy accurately can be challenging, especially if you fall into common traps that many beginners face. Avoiding these mistakes will save you time and improve the realism of your sketches. Let’s look at some frequent errors and how you can steer clear of them.
Proportion Errors
Birds have unique body proportions that differ widely from mammals or humans. One common error is making the head too large or the wings too small, which throws off the entire figure. Pay close attention to the size relationship between the head, body, and tail — sketching simple shapes first helps you keep proportions in check.
Have you ever drawn a bird that looked off but couldn’t put your finger on why? It’s often a sign that the proportions are wrong. Measuring parts against each other before adding details can fix this problem quickly.
Unnatural Poses
Birds move with grace and purpose, but sometimes your drawing might show stiff or awkward poses. Avoid poses that birds couldn’t realistically hold, like wings spread too wide without support or legs bent in impossible angles. Study photos or watch birds in motion to capture natural postures.
Try to imagine the bird’s movement before you draw. Ask yourself: Does this position make sense? Is the bird balanced? If the answer is no, adjust your sketch until it feels right.
Overcomplicating Details
It’s tempting to add every feather and texture, but too much detail early on can overwhelm your drawing and slow your progress. Start with basic shapes and broad features, then build details gradually. This approach keeps your work clear and focused.
Remember, details should enhance your drawing, not distract. Have you ever spent hours on tiny feathers only to lose the overall shape? Simplify first, then add complexity where it counts — like the eyes or wing tips.
Tools And Materials
Having the right tools and materials can make a huge difference when you draw bird anatomy. The precision and detail you want to capture depend largely on what you use. Choosing materials that suit your style and goals helps you focus on learning the bird’s structure without struggling with your tools.
Pencils And Pens
Pencils are essential for sketching bird anatomy because they allow you to build shapes lightly before adding details. Start with a range of hardness, like 2H for fine lines and 4B for shading. Mechanical pencils work well for precision, especially when drawing feathers or small beaks.
Many artists switch to ink pens for final outlines. Fine liners with tips from 0.05mm to 0.3mm offer control to highlight intricate features like talons or feather patterns. Have you noticed how switching from pencil to pen changes your focus from form to detail?
Paper Types
The type of paper you choose influences how your drawing turns out. Smooth Bristol paper is great for detailed pencil or pen work since it won’t cause your lines to bleed or smudge easily. If you want to add washes or watercolor later, try cold-pressed paper which has a bit more texture.
Think about the size too. Larger sheets give you space to explore wing spans and body posture, but smaller sketchbooks are perfect for quick practice. What paper do you find most comfortable when focusing on delicate bird features?
Digital Drawing Tips
Digital tools offer flexibility that traditional materials can’t match, especially when studying bird anatomy. Use a tablet with pressure sensitivity to mimic pencil strokes and control line thickness naturally. Programs like Procreate or Adobe Fresco have brushes designed to replicate feathers and soft shading.
One trick is to create layers for different parts of the bird—start with a basic skeleton, then add muscles, feathers, and shading separately. This way, you can adjust each layer without losing your progress. How might layering change the way you understand a bird’s structure?
Credit: www.skillshare.com
Frequently Asked Questions
What Are The Basic Bird Anatomy Parts To Draw?
Start with the head, body, wings, tail, and legs. Focus on proportions and shapes for accuracy. Use simple geometric shapes to outline these parts before adding details.
How Do Wing Structures Affect Bird Drawing?
Wing anatomy influences wing shape and feather arrangement. Understand primary, secondary, and covert feathers. This knowledge helps create realistic and dynamic wing positions in your drawing.
Why Is Understanding Bird Skeletal Structure Important?
The skeleton supports the bird’s posture and movement. Knowing bone placement improves drawing accuracy and realism. It helps in positioning limbs and understanding muscle attachments.
How To Depict Bird Feathers Realistically?
Observe feather layering and texture carefully. Use short, curved lines for individual feathers. Vary size and direction to mimic natural feather flow and depth in your drawing.
Conclusion
Drawing bird anatomy takes time and patience. Start with simple shapes and build details slowly. Practice helps you see how wings, beaks, and feathers fit together. Study real birds or photos to understand their structure better. Keep your lines light and adjust as you go.
Each sketch improves your skills and confidence. Enjoy the process and don’t rush. Soon, you will create drawings that look alive and natural. Keep drawing, and watch your bird art grow step by step.