
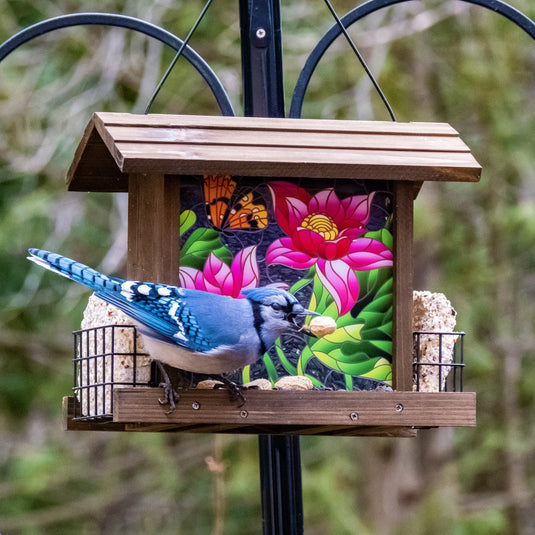
Have you ever wanted to add a splash of color to your garden while inviting beautiful birds to visit? Making a stained glass bird feeder is a fun and creative way to do just that.
Imagine watching vibrant birds feast from your unique, hand-crafted feeder that catches the sunlight in dazzling patterns. In this guide, you’ll discover simple steps to create your own stained glass bird feeder, even if you’ve never worked with glass before.
Ready to brighten your outdoor space and enjoy nature up close? Let’s get started!
Materials Needed
Gathering the right materials is essential for making a beautiful stained glass bird feeder. This project needs specific glass types, tools, and supplies. Choosing these carefully ensures a safe and attractive feeder. Here is a clear list of what you need before starting.
Glass Types And Colors
- Colored stained glass sheets – pick bright colors like red, blue, green
- Clear glass sheets – for parts where you want transparency
- Textured glass – adds interesting light effects
- Glass cutter – to cut sheets into shapes
- Glass grinder – smooth edges after cutting
Tools Required
- Soldering iron – for joining glass pieces
- Solder wire – usually lead-free for safety
- Flux – helps solder stick to metal foil
- Safety glasses – protect eyes while cutting and soldering
- Work gloves – protect hands from sharp glass edges
- Brush – to apply flux
Additional Supplies
- Copper foil tape – wraps glass edges for soldering
- Bird feeder frame or base – to hold glass pieces
- Wire or hooks – for hanging the feeder
- Patina (optional) – changes solder color for a finished look
- Cleaning solution – removes flux residue after soldering
Choosing A Design
Choosing the design for your stained glass bird feeder sets the tone for the entire project. It’s more than just picking a pretty pattern; it affects how easy the project will be and how much the birds will enjoy it. Think about your skill level, the space where you’ll hang the feeder, and what kind of birds you want to attract before making your choice.
Simple Vs. Complex Patterns
Simple patterns use larger pieces of glass and fewer cuts. These are perfect if you’re new to working with stained glass or want a quick build. You’ll spend less time on cutting and assembling, which means less chance for mistakes.
Complex patterns offer intricate details and lots of color changes. They can create stunning visual effects but require patience and precision. Ask yourself: do you enjoy detailed work, or do you prefer a straightforward project that still looks great?
Bird Feeder Shapes
The shape of your bird feeder influences both its look and function. Classic shapes like houses or lanterns are easy to build and provide good shelter for birds. Rounded or abstract shapes can be eye-catching but might need extra support or special techniques to assemble.
Think about your outdoor space. Would a hanging feeder fit better, or is a freestanding shape more practical? Your choice affects how birds approach and use the feeder, so consider their comfort too.
Selecting The Right Size
The size of your feeder matters a lot for attracting different types of birds. Small feeders are ideal for tiny birds like finches and chickadees, while larger feeders can accommodate bigger species such as cardinals or woodpeckers.
Also, think about how much seed you want to hold and how often you want to refill it. A feeder that’s too small means frequent trips to refill, and one that’s too big might waste seed if birds don’t visit often.
Cutting The Glass
Cutting the glass is a key part of making a stained glass bird feeder. This process shapes the glass pieces to fit the design perfectly. Precise cutting ensures the pieces fit well and look beautiful. It needs care and attention to detail. Handling glass safely is very important during this step.
Safety Precautions
Wear safety glasses to protect your eyes from glass shards. Use thick gloves to avoid cuts on your hands. Work on a flat, clean surface to keep glass stable. Keep a small brush or vacuum nearby to clean up glass bits. Avoid loose clothing or jewelry that can catch on glass. Always cut glass in a well-lit area.
Marking And Scoring
Use a permanent marker to draw shapes on the glass. Make sure lines are clear and easy to follow. Hold the glass cutter firmly and score along the lines once. Score in a straight, steady motion without stopping. Avoid pressing too hard to prevent cracks. The score line should be a light scratch, not a deep cut.
Breaking Glass Pieces
Place the scored line over the edge of a table or breaking tool. Apply gentle, even pressure on both sides of the score line. The glass will snap along the scored line. Use running pliers to help break small or curved pieces. Smooth sharp edges with a glass grinder or sandpaper. Handle each piece carefully to avoid injury.
Assembling The Feeder
Assembling the stained glass bird feeder is where your project takes shape. This phase requires care and precision to join the colorful glass pieces into a sturdy, beautiful feeder. Proper assembly ensures the feeder holds together well and lasts through many seasons of bird visits. Focus on smooth edges, strong bonds, and stable support to create a functional art piece.
Foiling The Glass Edges
Start by wrapping the edges of each glass piece with copper foil tape. This tape helps the solder stick to the glass. Press the foil firmly and smooth it down with a fid or your finger. Make sure the foil covers the edges evenly without wrinkles. This step creates a clean base for soldering and protects the glass edges.
Soldering Techniques
Heat your soldering iron and apply solder along the foiled edges to join the glass pieces. Use steady, even strokes for smooth seams. Avoid overheating the glass to prevent cracks. Connect all pieces carefully, checking alignment as you go. Clean the solder lines with flux remover to keep the finish shiny and neat.
Adding Structural Support
Reinforce the feeder by adding metal supports or a sturdy frame. This keeps the feeder strong and prevents bending or breaking. Attach support rods or wire along key joints and corners. Secure these supports firmly with solder or epoxy. Good structural support ensures the feeder holds up well outdoors.
Sealing And Finishing
Sealing and finishing your stained glass bird feeder is a crucial part of the process. It not only enhances the beauty of your creation but also protects it from weather damage. Taking the time to properly seal and finish ensures your feeder remains vibrant and durable through changing seasons.
Cleaning The Feeder
Before applying any sealant or finish, you need a spotless surface. Use a soft cloth and mild soap to gently remove any dust, grease, or fingerprints from the glass and solder lines. Avoid abrasive materials that could scratch the glass or damage the foil.
After cleaning, let the feeder dry completely. Moisture trapped beneath coatings can cause bubbles or peeling. Have you noticed how even a tiny speck of dust can ruin the smooth finish? Taking this extra care pays off.
Applying Patina
Patina adds a rich, aged look to the solder, making your bird feeder look professionally crafted. Choose from black, copper, or antique finishes to match your style. Apply the patina with a small brush or cotton swab, carefully covering all soldered areas.
Remember to wear gloves and work in a well-ventilated area; patina chemicals can irritate skin and lungs. After application, wipe off excess with a clean cloth to avoid uneven coloring. Have you tried mixing patina colors for a unique effect? It can add surprising depth.
Protective Coatings
To shield your feeder from rain, sun, and bird visits, a clear protective coating is essential. Use a waterproof, UV-resistant sealant designed for outdoor glass projects. Spray or brush on thin, even layers, letting each coat dry fully before adding the next.
Applying multiple coats improves durability but avoid thick layers that can drip or cloud the glass. If you prefer a natural finish, consider a non-glossy sealant that preserves the stained glass’s original shine. What’s your top priority—maximum protection or maintaining the glass’s sparkle?

Credit: www.studioartisane.com
Installing The Bird Feeder
Installing the stained glass bird feeder is an exciting final step. It ensures the feeder is safe and inviting for birds. Proper placement and secure hanging will protect the feeder and attract feathered visitors. Regular care keeps it looking beautiful and functional for a long time.
Choosing The Location
Pick a spot visible from your window. Birds enjoy quiet areas with some shade. Avoid places near busy roads or places with heavy foot traffic. Place the feeder near trees or bushes where birds can rest. Ensure the spot is easy for you to reach for refilling and cleaning.
Hanging Options
Use a sturdy hook or bracket to hang the feeder. Choose weather-resistant materials like metal or strong plastic. You can hang it from a tree branch, porch ceiling, or a freestanding pole. Make sure the feeder hangs steady and does not swing too much. A stable feeder keeps birds safe and comfortable.
Maintenance Tips
- Clean the feeder every two weeks to prevent mold and bacteria.
- Use warm water and mild soap for cleaning; rinse well.
- Check for cracks or damage in the stained glass regularly.
- Refill the feeder with fresh seed to keep birds returning.
- Move the feeder occasionally to avoid pest buildup.
Troubleshooting Common Issues
Creating a stained glass bird feeder is rewarding, but some issues may arise. Troubleshooting these problems keeps your feeder safe and beautiful. Small fixes can extend the feeder’s life and keep birds happy.
Fixing Loose Glass
Loose glass pieces can fall out or cause sharp edges. Check the glass regularly for any movement. Use a clear silicone adhesive to secure loose pieces. Apply a small amount along the edges and press gently. Let it dry fully before hanging the feeder again.
Repairing Solder Joints
Solder joints can crack or break over time. Inspect joints for any gaps or weak spots. Reheat the joint with a soldering iron to melt the old solder. Add fresh solder to strengthen the connection. Wear safety glasses and work in a ventilated area.
Preventing Weather Damage
Weather can wear down your feeder quickly. Use a weatherproof sealant on all metal parts. Avoid placing the feeder in direct sun or heavy rain. Regularly clean the feeder to prevent mold and dirt buildup. Store indoors during harsh winter months.

Credit: glassartstories.com
Credit: www.savealifebc.com
Frequently Asked Questions
How Do I Start Making A Stained Glass Bird Feeder?
Begin by designing your bird feeder shape on paper. Choose colorful stained glass pieces. Cut glass carefully using proper tools and safety gear. Assemble with copper foil and solder. Add hooks for hanging. Follow step-by-step instructions for best results.
What Materials Are Needed For A Stained Glass Bird Feeder?
You need stained glass sheets, glass cutter, copper foil tape, soldering iron, solder, flux, safety glasses, and gloves. Additional materials include a pattern template, hanging hooks, and a sturdy base. These tools and materials ensure a durable, attractive bird feeder.
How Do I Ensure The Feeder Is Safe For Birds?
Use non-toxic solder and flux to avoid harmful chemicals. Smooth all glass edges thoroughly to prevent injuries. Ensure the feeder is stable and weatherproof. Clean the feeder regularly to keep it hygienic for visiting birds.
Can I Customize The Stained Glass Design?
Yes, you can create any design you like. Use colorful glass pieces to match your garden decor. Personalize shapes, patterns, and sizes. Custom designs make your bird feeder unique and visually appealing.
Conclusion
Creating a stained glass bird feeder adds beauty to your garden. It brings colorful light and attracts lovely birds. You can enjoy watching birds while feeling proud of your work. This project needs patience but offers great satisfaction. Try different glass colors for unique designs.
Remember to keep your feeder clean for happy birds. Start with simple steps and build your skills. Making a bird feeder can be a fun, relaxing hobby. Your garden will become a peaceful, bright place. Give it a try and enjoy nature’s charm.