
If you want to capture stunning photos of birds without scaring them away, creating a hide is your secret weapon. A well-made hide lets you get close to your feathered subjects, giving you the chance to snap natural, up-close shots.
In this guide, you’ll learn simple and effective ways to build your own bird photography hide using easy-to-find materials. By the end, you’ll be ready to blend into nature and take photos that truly stand out. Ready to make your bird photography more exciting?
Let’s get started!

Credit: www.allaboutbirds.org
Choosing The Right Location
Choosing the right location for your bird photography hide is crucial. The success of capturing stunning bird shots often depends on where you set up. Your location determines the variety of birds you’ll see, the lighting quality, and how comfortable and safe you feel during your session.
Spotting Bird Activity
Look for signs of bird presence before setting up. Listen for calls, watch for movement, or observe feeding areas like berry bushes or water sources. Birds tend to gather where food and shelter are plentiful.
Spend some time scouting the area at different times of the day. Early mornings and late afternoons often show the most activity. Have you noticed how quiet areas suddenly come alive with bird sounds? That’s a good hint your hide will be in the right spot.
Considering Light And Weather
Natural light can make or break your photos. Position your hide with the sun behind you to illuminate the birds clearly. Avoid harsh midday sun that creates strong shadows and washes out colors.
Weather also affects bird behavior and your comfort. Windy spots can scare birds away, while rain can limit your shooting time. Check forecasts and choose sheltered spots that protect both you and your gear.
Assessing Safety And Accessibility
Your hide should be easy to reach without disturbing the birds. Look for paths or clearings that let you carry equipment quietly. Consider how far you’ll walk and whether the terrain is manageable with your gear.
Safety matters for you and the wildlife. Avoid areas with potential hazards like unstable ground, aggressive animals, or private property without permission. Have you thought about how you’ll exit quickly if needed? Planning ahead keeps your experience stress-free.
Credit: www.iphotography.com
Selecting Materials For Your Hide
Choose lightweight, natural materials like burlap or camouflage fabric to blend into the environment. Durable and breathable fabrics help you stay comfortable while staying hidden from birds.
Selecting the right materials for your bird photography hide is crucial. The materials you choose can affect comfort, ease of transport, and success in capturing stunning bird photos. Consideration of naturalness, weight, and durability is essential.Natural Vs. Synthetic Materials
Natural materials blend seamlessly with surroundings. They offer a more authentic feel. Leaves, branches, and grass are great options. They help the hide look part of the landscape. Synthetic materials provide durability. They are often waterproof and long-lasting. Options include camo netting and tarps. They resist weather and wear better than natural options.Lightweight And Portable Options
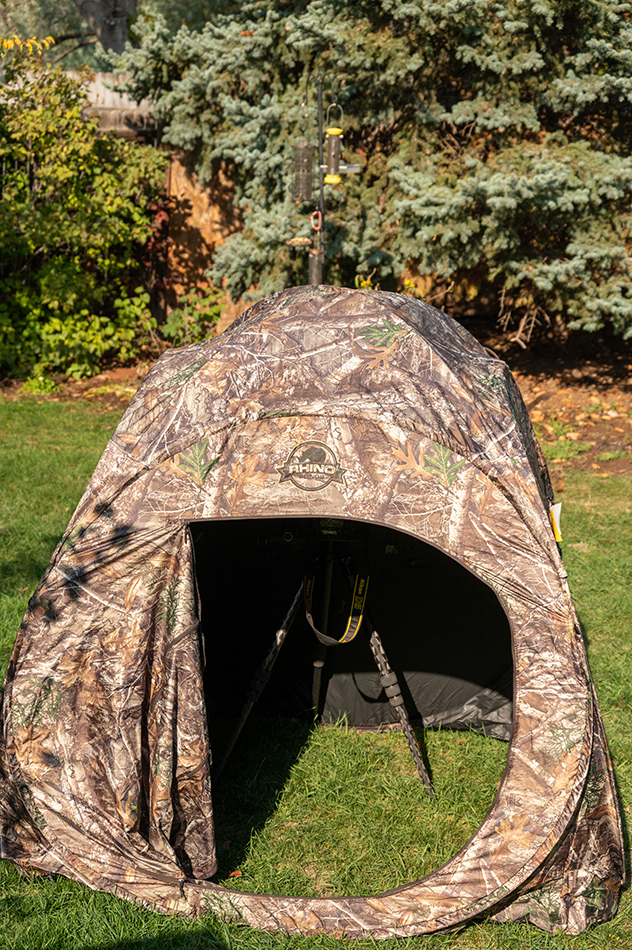
Lightweight materials ease transportation. They make setup and takedown faster. Consider collapsible frames for portability. Fabric hides or pop-up blinds are light. They are easy to carry to remote locations. Look for materials that fold or roll up. This ensures they fit in a backpack or bag.Durability And Camouflage
Durability ensures your hide lasts through seasons. Choose materials that withstand rain, sun, and wind. High-quality tarps and nets resist tearing. Camouflage is key for blending in. Patterns should mimic natural environments. Choose colors matching the area’s foliage. This helps avoid disturbing your feathered subjects.Building The Hide
Building a hide for bird photography requires careful planning and simple construction. The goal is to create a space that blends into nature while giving you a clear view of the birds. Comfort and ease of use matter, so you can stay still for long periods. A well-built hide helps capture close-up shots without disturbing wildlife.
Basic Structural Designs
Choose a design that fits your location and needs. A simple box shape works well for beginners. Use lightweight materials like wood or PVC pipes. A foldable design is easy to carry and set up. Make sure the hide has enough room for your camera and movement. Windows or openings should be large enough for your lens but small enough to keep birds unaware.
Incorporating Camouflage Techniques
Camouflage helps the hide blend into its surroundings. Use natural colors like green, brown, and gray for paint or fabric. Attach leaves, branches, or grass to the outside for extra cover. Avoid shiny surfaces that can reflect light. Match the hide’s shape to nearby plants or trees. Keep movement inside the hide to a minimum to avoid detection by birds.
Ensuring Comfort And Functionality
Comfort keeps you focused and patient during long sessions. Add a padded seat or cushion inside the hide. Include storage for camera gear and snacks. Ensure good ventilation to prevent overheating. Make openings easy to open and close quietly. A small roof overhang protects from rain and sun. Keep the interior simple to avoid distractions.
Positioning The Hide
Positioning your bird photography hide correctly is key to capturing stunning shots without disturbing your feathered subjects. It’s about balancing closeness with comfort for both you and the birds. Getting this right often means spending some time observing and adjusting before you settle in.
Optimal Distance From Birds
Finding the right distance can be tricky. Too close, and the birds will flee; too far, and your photos lose detail. A good rule is to start at about 15 to 20 meters away, then adjust based on the species’ behavior.
Smaller birds often tolerate closer hides, while larger, more cautious species need more space. Pay attention to how they react—if they seem nervous or stop feeding, you’re too close. Remember, patience helps you find that sweet spot.
Facing The Right Direction
Position your hide so you face the area where birds usually land or feed. This avoids sudden movements that might scare them away. If the sun is behind you, your photos will have better natural lighting and color.
Try to align your hide with common flight paths or perches. This increases your chances of capturing action shots. I once missed a great photo because my hide faced away from the morning sun—lighting makes all the difference.
Minimizing Disturbance
Keep noise and movement to a minimum when setting up your hide. Wear quiet clothing and avoid sudden gestures. Even small disturbances can alert birds and ruin your chances for close-up shots.
Use natural cover like bushes or tall grass to blend in. This not only hides you but also reduces shadows that might alarm the birds. Think about how you can move slowly and calmly to avoid drawing attention.
Equipping Your Hide
Equipping your bird photography hide properly makes a big difference in your experience. The right gear helps capture clear photos while keeping you comfortable and safe. Prepare carefully to stay focused and ready for every bird sighting.
Essential Photography Gear
- Camera with a telephoto lens for close-up shots
- Tripod or monopod to stabilize your camera
- Extra batteries to avoid power loss during long waits
- Memory cards with ample space for many photos
- Lens cleaning kit to keep your lens clear of dust
- Remote shutter release for steady shots without touching the camera
Comfort And Safety Items
- Camouflage clothing to blend with the environment
- Portable chair or cushion for long sitting periods
- Water bottle and snacks to stay hydrated and energized
- Sun protection such as a hat and sunscreen
- Insect repellent to avoid bites and distractions
- First aid kit for minor injuries
- Weather-appropriate clothing to handle cold or rain
Additional Accessories
- Notebook or voice recorder to note bird behaviors and settings
- Binoculars to spot birds from a distance
- Camouflage netting to cover the hide
- Small flashlight for early morning or late evening use
- Ziplock bags to keep electronics dry
- Trash bag to leave the area clean
Credit: www.tombolphoto.com
Tips For Successful Bird Photography
Successful bird photography requires more than just a good camera and a hide. It demands patience, knowledge, and the right camera settings. Understanding these elements helps capture clear and captivating bird images. These tips improve your chances of getting that perfect shot.
Patience And Timing
Birds do not always appear on cue. Waiting quietly in your hide is essential. Early morning and late afternoon offer the best light. These times also see the most bird activity. Avoid sudden movements or loud noises. Birds react quickly to disturbances. Patience lets you observe natural behavior and capture unique moments.
Reading Bird Behavior
Watch how birds move and interact. Each species has its own habits and patterns. Notice when they feed, rest, or take flight. Recognizing these signs helps predict their next move. This knowledge allows better positioning and timing for your photos. Learn from bird guides or local birders to improve your skills.
Adjusting Camera Settings
Use fast shutter speeds to freeze motion clearly. Adjust ISO to maintain good exposure without noise. Aperture controls how much of the bird and background are in focus. Use continuous autofocus to track moving birds. Experiment with settings before entering the hide. This preparation helps you react quickly to sudden bird activity.
Frequently Asked Questions
What Materials Are Best For Building A Bird Photography Hide?
Use natural materials like branches, leaves, and burlap. These blend well with the environment and avoid scaring birds. Lightweight, portable frames like PVC pipes or wood also work great.
How Do I Position My Hide For The Best Bird Shots?
Place the hide near bird feeding spots or water sources. Ensure it faces natural light, ideally with the sun behind you. Camouflage it well to avoid disturbing birds.
How Long Should I Wait Inside The Hide Before Shooting?
Allow at least 15-30 minutes for birds to acclimate. Stay quiet and still to avoid startling them. Patience improves your chances of capturing natural behavior.
Can I Use A Portable Hide For Bird Photography?
Yes, portable hides are convenient and easy to set up. They offer flexibility to move between locations and are great for short trips.
Conclusion
Building a bird photography hide takes patience and care. Use natural materials to blend with the environment. Place the hide where birds often visit. Stay quiet and move slowly to avoid scaring them. A good hide helps you get closer shots without disturbing wildlife.
Practice regularly to improve your skills. Enjoy the calm and beauty around you. Bird photography becomes more rewarding with each try. Keep learning and experimenting with different hide designs. Your photos will tell amazing stories of nature.