
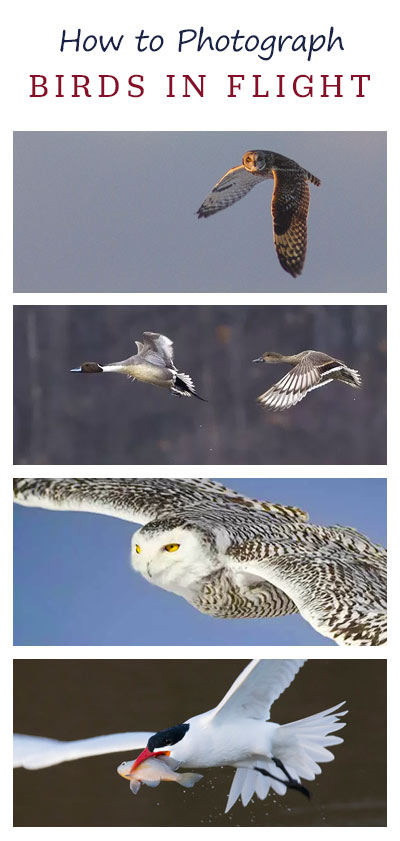
Have you ever felt the thrill of capturing the perfect shot of a bird soaring through the sky? It’s an exhilarating moment, where precision meets patience.
Photographing birds in flight can be challenging, but with the right tips and techniques, you can master this art. Imagine the satisfaction of freezing a moment in time as a majestic eagle spreads its wings against the backdrop of a vibrant sunset.
This is your chance to elevate your wildlife photography skills and create stunning images that captivate the senses. Stick around, and you’ll discover simple, actionable tips that will transform how you photograph birds in motion. Ready to take your photography to new heights? Let’s dive in.

Credit: blog.henrys.com
Choosing The Right Gear
Choosing the right gear can make a huge difference in your success photographing birds in flight. The challenge lies in capturing sharp, well-exposed images of fast-moving subjects against often unpredictable backgrounds. Your camera and lenses need to keep up with the speed and agility of birds, while accessories help stabilize and enhance your shots.
Best Cameras For Bird Photography
Look for cameras with fast autofocus and high frame rates. These features help you track birds as they dart through the sky and snap multiple shots quickly, increasing your chances of a great capture.
- DSLRs and Mirrorless Cameras:Both types work well, but mirrorless cameras often offer faster autofocus and lighter bodies, which help during long shooting sessions.
- High Frames Per Second (FPS):Aim for at least 7-10 FPS to capture rapid wing movements and flight details.
- Crop Sensor vs. Full Frame:Crop sensors give extra reach, which is useful for distant birds, but full frame cameras handle low light better, helping during early morning or late evening shoots.
When I switched from a basic DSLR to a mirrorless camera with 12 FPS, my hit rate on sharp flight shots doubled. What camera features have you found most helpful in your bird photography?
Essential Lenses And Accessories
Telephoto lenses are a must for bird photography since birds rarely allow close approach. Lenses with focal lengths between 300mm and 600mm give you the reach needed to fill the frame without disturbing wildlife.
- Prime Lenses:Offer sharper images and wider apertures, great for low light, but less flexible in framing your subject.
- Zoom Lenses:Provide versatility to adjust composition quickly during flight, especially useful with unpredictable bird movements.
- Tripods and Monopods:Help stabilize heavy lenses, reducing fatigue and camera shake during long waits or tracking fast birds.
- Extra Batteries and Memory Cards:Flight photography sessions can be long and demanding on gear, so always carry spares to avoid missing moments.
I once missed a perfect eagle flight shot because my lens was too short to zoom in quickly. Investing in a quality 400mm f/5.6 zoom lens changed how I frame flying birds and improved my success rate. What’s your go-to lens setup for chasing birds in the wild?
Mastering Camera Settings
Mastering your camera settings is key to capturing sharp, stunning images of birds in flight. Birds move fast and unpredictably, so your camera needs to keep up. Adjusting settings like shutter speed, ISO, and focus modes can make the difference between a blurry shot and a breathtaking capture.
Shutter Speed And Iso Tips
Shutter speed controls how long your camera’s sensor is exposed to light. For flying birds, fast shutter speeds are essential—think 1/2000 second or faster. This freezes the motion and keeps wings crisp.
ISO affects your camera’s sensitivity to light. Raising ISO helps maintain fast shutter speeds in dimmer conditions but watch out for noise. I often start around ISO 400 and increase only when necessary.
- Use shutter priority mode to let the camera adjust ISO automatically while you control shutter speed.
- Test different ISO settings to find your camera’s sweet spot between brightness and noise.
- Early morning or late afternoon light may require higher ISO to capture sharp images without motion blur.
Focus Modes For Moving Subjects
Choosing the right focus mode is critical when your subject won’t stay still. Continuous autofocus (AI Servo or AF-C) tracks moving birds and adjusts focus as they change position.
Don’t rely on single autofocus mode; it locks focus on one spot and often misses the mark with flying birds. Instead, use dynamic or zone focusing modes to cover a wider area and increase your hit rate.
- Experiment with back-button focus to separate focusing from shutter release—this gives you more control.
- Try different autofocus area sizes; sometimes a smaller area works better for distant birds, while a larger zone helps track erratic movement.
- Practice keeping the bird centered in your frame while your camera maintains focus automatically.
Have you noticed how your success rate changes when you tweak these settings? Adjusting camera controls isn’t just technical—it’s about understanding your subject’s behavior and responding quickly. What settings have you found most effective for your bird-in-flight shots?
Planning Your Shoot
Planning your bird-in-flight photography shoot is crucial for capturing stunning images. The right preparation helps you anticipate bird behavior and environmental conditions. Before you even raise your camera, consider where and when your shoot will take place to maximize your chances of success.
Selecting Ideal Locations
Choosing the right location can make or break your shoot. Look for areas known for active bird populations like wetlands, shorelines, or nature reserves. I once found a hidden pond where kingfishers darted constantly, giving me perfect flight shots.
Scout your location ahead of time to identify good vantage points and potential backgrounds. Think about accessibility and safety too—some spots may require permits or involve tricky terrain. Are there places near you where birds gather regularly? Visiting these spots often builds familiarity with bird habits.
Timing For Perfect Lighting
Lighting dramatically affects the quality of your images. Early mornings and late afternoons offer soft, warm light that highlights feathers and creates depth. Midday sun can be harsh, causing unwanted shadows and blown-out highlights.
Observe how light changes throughout the day at your chosen spot. Sometimes, waiting a little longer or arriving earlier can mean the difference between a dull image and one that pops. Have you noticed how some bird photos feel more alive simply because of the light?

Credit: store.bandccamera.com
Techniques For Capturing Flight
Capturing birds in flight challenges your skills and patience. You need sharp focus, steady hands, and a clear plan. The right techniques help you freeze motion and create stunning images that tell a story of movement and freedom.
Tracking And Panning Methods
Tracking a bird in flight means following its movement smoothly with your camera. It requires practice to keep the bird centered while it moves unpredictably. Try to anticipate its direction and speed to maintain focus.
Panning involves moving your camera along with the bird’s flight path. This keeps the bird sharp while blurring the background, adding a sense of motion. Start with slower shutter speeds, around 1/125 to 1/250 seconds, to master panning before increasing speed.
- Use continuous autofocus mode to keep the bird sharp as it moves.
- Hold your camera firmly and move your whole body, not just your arms.
- Practice following birds in open spaces like parks or shorelines.
Once, while photographing a hawk, I realized I was too focused on the bird and not moving smoothly. After adjusting my stance and moving with the bird’s flight, I captured sharp, dynamic shots that I never thought possible.
Anticipating Bird Behavior
Understanding how birds behave helps you predict their next move. Watch how they take off, soar, or dive to prepare your camera settings and framing.
Look for cues like wing flapping speed, eye direction, and body posture. These hints give you extra seconds to lock focus and compose your shot.
- Spend time observing birds before shooting to learn their patterns.
- Note if the bird tends to fly toward certain perches or open areas.
- Adjust your position to get a clear line of sight without obstacles.
Have you noticed how some birds hesitate just before taking off? That pause is your moment to ready your camera and capture the perfect launch. Paying attention to these small details can transform your flight photography.
Post-processing Tips
Post-processing is a vital step in bird photography. It improves image quality and highlights details that the camera may miss. Careful editing can transform a good shot into a stunning wildlife photo.
Focus on enhancing sharpness and adjusting composition. These edits bring out the beauty of birds in flight and make the photo more engaging.
Enhancing Sharpness And Detail
Start by sharpening the bird to emphasize feathers and eyes. Use tools like the sharpening brush or clarity slider carefully. Over-sharpening creates unnatural edges and noise.
Increase contrast slightly to add depth. Adjust the texture to bring out small details without losing softness. Noise reduction helps smooth grainy areas, especially in low light photos.
Cropping And Composition Adjustments
Crop to remove distractions and focus on the bird. Follow the rule of thirds to place the subject off-center for a balanced look. Leave space in the direction of the bird’s flight to add motion.
Straighten the horizon or background lines to avoid tilting. Small composition tweaks improve the overall visual impact and guide the viewer’s eye.
Common Challenges And Solutions
Photographing birds in flight presents unique challenges that can test your skills and patience. Understanding common problems and how to solve them will improve your shots and keep frustration at bay. Let’s look at some obstacles you’re likely to face and practical ways to overcome them.
Dealing With Background Distractions
Busy backgrounds can steal attention from your bird and make your photo look cluttered. Look for clean skies or blurred backgrounds by using a wide aperture to create shallow depth of field.
Try positioning yourself so the bird is framed against a simple backdrop like open sky or distant trees. If you spot distracting branches or power lines, change your angle rather than trying to fix it later in editing.
Have you noticed how a plain background makes the bird’s colors pop? This is your chance to make the subject stand out sharply.
Managing Fast-moving Subjects
Birds in flight move quickly and unpredictably, which can make focusing tricky. Use continuous autofocus (AI Servo or AF-C mode) to keep the bird sharp as it moves.
Practice tracking with your camera before shooting—follow a bird’s flight path smoothly to improve your chances of a clear shot. High shutter speeds, typically 1/2000 sec or faster, freeze motion and reduce blur.
Do you find it easier to shoot when you anticipate the bird’s movements? Learning common flight patterns can help you prepare and react faster.

Credit: digital-photography-school.com
Frequently Asked Questions
What Camera Settings Work Best For Bird Flight Photography?
Use a fast shutter speed of at least 1/2000s to freeze motion. Set continuous autofocus and burst mode. Use ISO 400-800 for sharp images. Aperture around f/5. 6 balances depth and light. Adjust settings based on lighting and bird speed for optimal results.
How To Track Birds Flying For Sharp Photos?
Focus on the bird’s head and maintain continuous autofocus. Use burst mode to capture multiple frames. Practice smooth panning with your camera. Anticipate the bird’s flight path. This helps keep the bird in focus and improves your chances of sharp shots.
What Lenses Are Ideal For Photographing Birds In Flight?
Telephoto lenses between 300mm and 600mm are ideal. They offer good reach without sacrificing image quality. Use lenses with image stabilization for steadier shots. Prime lenses often provide sharper images but less flexibility. Choose based on your budget and shooting style.
How To Find The Best Lighting For Bird Flight Photos?
Shoot during golden hours—early morning or late afternoon—for soft, warm light. Avoid harsh midday sun which causes shadows and highlights. Position yourself with the sun behind you to illuminate the bird. This enhances detail and color in your photos.
Conclusion
Capturing birds in flight takes patience and practice. Use fast shutter speeds to freeze motion clearly. Focus on the bird’s eyes for sharp images. Choose good lighting, preferably early morning or late afternoon. Keep your camera steady and track the bird smoothly.
Try different angles and backgrounds for variety. Enjoy the process and learn from each shot. Over time, your photos will improve naturally. Remember, bird photography is about patience and passion. Keep shooting and have fun with every flight.