
Imagine capturing a stunning image of a bird where every feather is visible, even in challenging lighting conditions. You might wonder how professional photographers achieve such clarity and detail.
The secret often lies in the use of fill flash, a technique that can transform your bird photography. Whether you’re shooting in the harsh midday sun or under the shade of dense foliage, fill flash can be your best friend.
It helps to fill in shadows, highlight intricate details, and bring your bird images to life. Curious about how this can enhance your photography skills? Discover how you can master the art of using fill flash and elevate your bird photography to new heights. Read on to unlock the secrets that can make your next bird photo shoot a breathtaking success.
Benefits Of Fill Flash In Bird Photography
Fill flash offers many benefits in bird photography. It helps reveal hidden details and improves image quality. Using fill flash creates balanced and attractive photos. It brightens shadows without washing out natural light. This technique adds a professional touch to bird images. Photographers gain more control over light and contrast. The result is sharper, clearer, and more vibrant bird pictures.
Enhancing Details In Shadows
Birds often perch in shaded areas. Shadows can hide important features like feathers and eyes. Fill flash gently lights these dark spots. It reveals textures and colors hidden by shade. This makes the bird look clearer and more lifelike. Details become visible without harsh shadows or glare. The flash blends softly with natural light for a natural look.
Balancing Harsh Lighting
Bright sunlight creates strong contrasts and glare. Birds may appear too dark or too bright in photos. Fill flash adds light to shadowed areas. It reduces the gap between bright and dark parts. This balance prevents overexposed highlights and deep shadows. The bird stands out without losing background details. Photos look evenly lit and easier on the eyes.
Adding Depth And Dimension
Fill flash adds a three-dimensional feel to flat scenes. It creates gentle highlights on the bird’s feathers. Shadows soften, making shapes and contours clear. This depth makes the bird pop from the background. Images gain a sense of realism and life. The bird appears more vivid and appealing to viewers.
Choosing The Right Fill Flash Equipment
Choosing the right fill flash equipment can make a big difference in your bird photography. The right tools help balance light, reduce harsh shadows, and bring out the natural colors of your subject. But not every flash setup works equally well for every situation, so understanding your options is key to capturing stunning bird images.
Built-in Vs External Flash
Most cameras come with a built-in flash, which is convenient but often limited in power and flexibility. Built-in flashes can create harsh, direct light that scares away birds or produces unnatural shadows.
External flashes offer more control and stronger light output. They can be positioned off-camera, giving you creative freedom to soften shadows and light your subject from different angles.
If you want better results, investing in an external flash is usually worth it. Have you noticed how much more natural your photos look when the light isn’t coming straight from the lens?
Flash Power And Size Considerations
Flash power matters because birds often keep their distance. A weak flash might not reach your subject effectively, especially if you’re using a long lens. Look for flashes with adjustable power settings so you can control the intensity based on your shooting distance.
Size is another factor. Larger flashes tend to be more powerful but heavier and less portable. If you hike to remote locations, a compact, lightweight flash might suit you better, even if it means sacrificing some power.
Think about where you usually shoot. Are you in open fields or dense forests? Your choice should reflect your typical environment.
Diffusers And Modifiers
Harsh flash can ruin a great shot by creating unnatural highlights and shadows. Diffusers and modifiers help spread and soften the light for a more pleasing effect.
Simple diffusers attach to your flash and reduce the intensity of direct light. Softboxes and bounce cards can redirect light, creating softer, more natural illumination that highlights the bird’s details without startling it.
Experiment with different modifiers to see what works best for your style. Have you tried bouncing your flash off a nearby surface instead of pointing it directly at the bird? It often produces surprisingly gentle light.
Camera Settings For Effective Fill Flash
Setting the right camera controls is key to using fill flash effectively in bird photography. Proper settings balance natural light and flash output. This balance ensures birds look well-lit without harsh shadows or washed-out colors. Adjusting flash exposure compensation, shutter speed, aperture, and ISO helps capture sharp, vibrant images with natural detail. Understanding these settings allows you to enhance your photos subtly and beautifully.
Optimal Flash Exposure Compensation
Flash exposure compensation adjusts the flash brightness. Use negative values to reduce flash power if images look too bright. Positive values increase flash output when the subject appears too dark. Start with 0 and adjust in small steps, like -1/3 or +1/3 stops. Watch your camera’s histogram and preview screen for the best balance. This control prevents overexposed highlights and keeps bird feathers detailed.
Shutter Speed And Aperture Tips
Shutter speed controls motion blur and ambient light exposure. Choose a speed fast enough to freeze bird movement, usually 1/1000 second or faster. Aperture affects depth of field and flash brightness. Use a wider aperture (small f-number) to let in more light and blur backgrounds. A typical range is f/5.6 to f/8 for sharp birds and soft backgrounds. Adjust these settings to keep the bird sharp and properly lit.
Iso Settings For Fill Flash
ISO controls camera sensor sensitivity to light. Use a low ISO, like 100 or 200, for cleaner images with less noise. Higher ISO values brighten images but add grain, especially in shadows. Increase ISO only if you need faster shutter speeds or smaller apertures in low light. Balance ISO with flash power to maintain natural colors and sharpness in your bird photos.
Techniques For Natural-looking Fill Flash
Using fill flash in bird photography can brighten shadows and highlight details. The key is to keep the light soft and natural. Harsh flash can make photos look artificial or overexposed. There are simple techniques to ensure your fill flash blends smoothly with natural light.
Bouncing Flash For Softer Light
Bouncing flash means aiming the flash at a nearby surface instead of directly at the bird. This surface could be a wall, ceiling, or even a white reflector. The flash light bounces off and spreads out, creating a softer, more natural glow.
This technique reduces harsh shadows and bright spots on feathers. It also avoids startling the bird with a sudden bright flash. Use a flash with a swivel head to easily adjust the direction of the light.
Using Flash In Overcast Conditions
Cloudy days provide soft, even light but can make birds look flat and dull. Fill flash can add a gentle lift to details and colors. Set your flash power low to avoid overpowering the soft ambient light.
Keep the flash close to the camera lens to keep the light direction natural. This helps maintain depth and texture without creating unnatural shadows. Overcast light and gentle flash work well together to create balanced images.
Avoiding Overexposure
Overexposure can wash out bird details and color. Adjust your flash power to the lowest effective setting. Use your camera’s flash exposure compensation to fine-tune brightness.
Check your histogram for blown highlights and adjust settings accordingly. Use manual flash mode for better control. Always review images and make small changes to keep light balanced.
Positioning And Timing The Flash
Positioning and timing the flash are key to capturing sharp, well-lit bird photos. Proper flash placement can soften shadows and highlight details. Accurate timing syncs the flash with the bird’s movement, freezing action and enhancing clarity.
Angles To Reduce Shadows
Place the flash at a 45-degree angle from the bird. This angle softens harsh shadows on feathers and under the beak. Avoid direct frontal flash to prevent flat, unnatural images. Side or slightly above the bird creates natural light flow.
Use bounce flash on nearby surfaces to spread light evenly. Adjust the flash height to match the bird’s level for balanced illumination. Experiment with angles to find the most flattering light for each species.
Synchronizing Flash With Bird Movements
Birds move quickly and unpredictably. Use a flash with a fast recycle time to keep up. Trigger the flash just as the bird takes flight or perches. Anticipate moments by observing bird behavior closely.
Combine flash with continuous shooting mode for better chances of capturing perfect timing. Wireless flash triggers help control off-camera flash remotely and improve timing precision.
Working With Fast Shutter Speeds
Fast shutter speeds freeze motion and reduce blur in bird photography. Use shutter speeds of 1/1000 second or faster with flash. This ensures sharp images even with rapid wing movement.
Sync your flash with the camera’s high-speed sync mode if available. It allows flash use at higher shutter speeds beyond the normal limit. Balance shutter speed, aperture, and ISO for optimal exposure and flash effect.
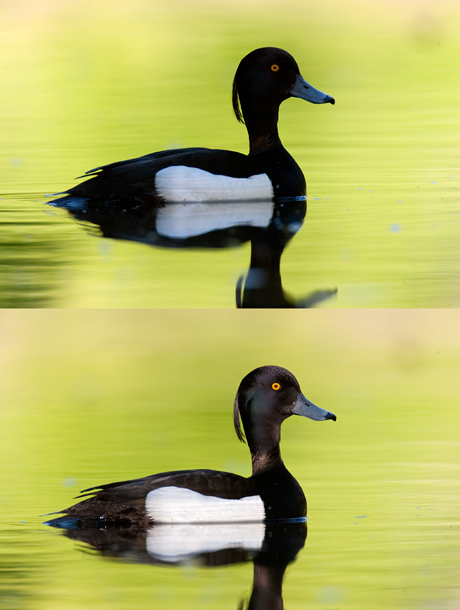
Credit: vogelfotografien.wordpress.com
Common Challenges And Solutions
Using fill flash in bird photography can improve photos but brings some challenges. These challenges affect photo quality and bird behavior. Knowing solutions helps take better pictures and keeps birds safe. This section covers common issues and how to fix them.
Dealing With Red-eye
Red-eye happens when the flash reflects off the bird’s eyes. It looks unnatural and distracting. To reduce red-eye:
- Use a flash diffuser to soften light.
- Change the flash angle, avoid direct flash.
- Increase distance between camera and flash.
- Use photo editing software to correct red-eye.
Minimizing Disturbance To Birds
Flash can scare birds, causing them to fly away. This stops you from capturing good shots. To keep birds calm:
- Use low flash power for gentle light.
- Take photos from a distance using zoom lenses.
- Limit flash use to short bursts.
- Avoid flashing during sensitive bird activities like feeding.
Managing Battery Life
Flash drains camera batteries quickly. Running out of power stops your session. To manage battery life:
- Carry extra batteries fully charged.
- Turn off flash when not needed.
- Use energy-saving flash modes.
- Check battery status regularly during shoots.
Post-processing Tips For Fill Flash Images
Post-processing plays a key role in perfecting fill flash images in bird photography. It helps refine the flash’s impact, making the bird stand out naturally. Editing also balances light and shadow, creating a more pleasing photo. Color corrections ensure the image looks true to life. These steps enhance your fill flash shots effectively.
Enhancing Flash Effects
Start by adjusting the brightness and contrast to highlight the flash’s power. Use local adjustments to brighten the bird without overexposing the background. Dodging and burning techniques can add depth, making the subject pop. Avoid harsh changes that create unnatural looks. Subtle enhancements keep the image realistic and engaging.
Balancing Highlights And Shadows
Fill flash can create strong highlights and deep shadows. Use shadow recovery tools to bring out details in darker areas. Tone down highlights that appear too bright or distracting. This balance preserves texture and detail in feathers. A well-balanced image feels more natural and eye-catching.
Correcting Color Temperature
Flash often changes the color tone of your photo. Adjust the white balance to match natural daylight or the scene’s mood. Use temperature and tint sliders to remove color casts. Aim for accurate colors, especially in feathers and backgrounds. Proper color correction ensures your image looks vibrant and true.

Credit: vogelfotografien.wordpress.com

Credit: medium.com
Frequently Asked Questions
What Is Fill Flash In Bird Photography?
Fill flash is a technique that uses a flash to brighten shadows. It balances natural light and reduces harsh contrasts in bird photos. This helps capture more detail and vibrant colors in shaded or backlit conditions.
When Should I Use Fill Flash For Bird Photos?
Use fill flash when natural light creates strong shadows or backlighting. It works best in early morning, late afternoon, or shaded areas. Fill flash enhances details and colors without overpowering the natural scene.
How Do I Set Up Fill Flash On My Camera?
Set your camera to flash mode and reduce flash power to 1/4 or 1/8. Use TTL (Through The Lens) mode if available for automatic adjustment. Position yourself to avoid harsh shadows or reflections on the bird.
Will Fill Flash Disturb Birds During Photography?
Using low-intensity fill flash rarely disturbs birds. Avoid direct, strong flash and keep distance. Quick, subtle flashes help maintain natural behavior while improving photo quality.
Conclusion
Using fill flash can brighten your bird photos and add detail. It helps balance light and shadow in tricky scenes. Practice controlling flash power to avoid overexposure. Try different angles to find the best light on your subject. Fill flash works well during bright days and backlit situations.
Keep your camera settings in mind for sharp, clear images. With patience, your bird photos will look more lively and vibrant. Give fill flash a try on your next birding trip. You might see a big difference in your pictures.